Friday, December 14, 2012

Holiday Crafting


Just a few things my kids did this week for the holiday season.  This week, we focused specifically on Hanukkah, and although the crafting options are limited with my 18-24 months, I think we did a pretty good job.  First, we created these Star of Davids using tissue paper and fancy foil paper I found and Artists and Crafstman Supply.  I gave each child a bunch of blue tissue paper squares to work with and allowed them to arrange the squares however they wanted on the page.  I cut the stars out ahead of time, and once the tissue paper part was complete, I framed the work with the pre-cut star shape.  They turned out beautifully, and I'm including a latke recipe for the parents inside the card...


 ...This is definitely not an original idea, but still a wonderful project.  I'm pretty sure you can do anything with paper plates or toilet paper rolls, seriously.  This is pretty straight-forward:  I halved 2 sizes of paper plates and glued the pieces together, then I let my kids decorate their menorah  with metallic paint stampers and tissue paper.  After they were finished, we used Popsicle sticks and glitter to create candles.  I didn't think about this at the time, but you could make the Sham ash (the candle used to light the other candles) a different color.

 Also, this is the starting point for our winter wall mural.  On the first day, it was just the snowman, all by his lonesome, but my kids made some very lovely evergreens to keep him company...


...As you can tell, I'm on a serious tissue paper kick.  I cut out trees for the kids to decorate, and all gave them some shiny star stickers to work with.  Some of my younger kids needed a little assistance as their fine motor skills are not quite developed, but they worked very hard and did a great job...


 ...I think my favorite little detail from the mural are the twinkle lights.  I traced a whole bunch of light bulb templates on one side of large pieces of tag board, and let my kids finger paint on the other side.  I stuck to primarily holiday colors, a lot of red, green, and yellow, although I tried to keep green and red separate so that I wouldn't end up with brown.  I did the same thing in order to create fall leaves earlier this year.


That's all for now.  More to come...

Thursday, December 6, 2012

Speaking of Variations...

Since I'm on this no-mess, throw-it-in-a-sealed-container-with-paint-and-shake-it kick, I thought I'd try it out with these pine cones...


We all love glitter...sure we do, but it does have a tendency to get everywhere and never ever go away.  So I figured I would try to keep the glitter factor a bit more contained.


 I just rolled the pine cones in a good coating of glue...


...and tossed some glitter in a large yogurt container and let my kids do the rest.  This was a great solution to glitter woes, and the finished product was gorgeous.  

Prints and Pollocks

 It's seriously been a while since I've updated, even though I have a ton of pictures waiting to be posted and lots of projects to talk about.  These two projects were really fun and complimented each other well, so I thought I'd throw them into one post...


My toddler classes worked on these mini Pollock paintings (R) using the tried and true marble painting technique.  We used a variety of objects, including beads and seashells, and got a ton of different effects.  The kids loved the concept of making lots of noise while creating artwork.  Preschool and Pre-K worked on these fabulous aluminum foil prints (L), and they absolutely adored this project.  A lot of the kids wanted to do multiple prints, so I let them try all kinds of color combinations and paint thicknesses.  The example above is one of my favorites...


...Here's a few more examples of these projects...


 ...I also used the same marble painting technique to make these paper chain strips.  I threw a little glitter in the mix as well.  I love that they look like sparkly bacon strips..


The work looked wonderful when it was displayed together on the art wall, and I was really excited to try all kinds of variations.  Give these projects a try!

Wednesday, October 24, 2012

New Paintings

I've finally started to make some headway on the paintings for Chhaya, and here is a look at some of the stuff I've been working on:


This one is 36"x48", although my seriously lousy smartphone camera does not do the best job of capturing detail...


Here's a detail of part of the city on the horizon line.  There is a long-standing tradition of miniature painting in India, and I'm interested in creating some small-scale pieces as well.  


Detail of Dog-thing.  Not sure exactly what this creature is, but I think it's a dog...


Detail of moth and moon.

This is the second painting(R); it measures 30"x40".  And here's a detail of the patterns in the background(L).  I've just started another layer of these patterns, so they'll be more pics to come...


Here's a couple more sketches as well, both pen and ink.  I plan to have a few clusters of smaller pieces throughout the show, and perhaps some prints available of the drawings as well.


 That's about it for now, but I should have another post coming up soon about some Fall and Halloween projects I did with my kids.  

Friday, October 12, 2012

Monarch Madness

Autumn is definitely my favorite season, not only because it's a beautiful time of year, but also because I love all fall-related crafts and activities.  That being said, there is a limit to how many projects one can do involving leaves, corn and pumpkins.  This week, I decided to focus on another interesting aspect of fall:  the migration of monarch butterflies.  We created a whole slue of these gorgeous creatures for the art wall.


...This was the complete project.  Pre-K and preschool made larger butterflies out of butcher paper and tempera paint (the go-to combination for all ECE art teachers!).


...Older toddlers worked with a variety of collage materials, such as tissue paper, felt and construction paper...


...my kids worked with liquid watercolors, sea salt and glitter...


...I also included a little bit of information about the monarch's journey and what route they take...


I think this one might be my favorite.  I love the use of color and the pattern this student created.  My students had a lot of fun with this project and I think I'm going to do variations of it in the future.  

Friday, October 5, 2012

New Work


Yet more recent sketches.  These are inspired by Hindu imagery and painting.  I've recently become very interested in this aesthetic, particularly their use of pattern and line work.  


I just started a large painting similar to this work.  This is a totally new direction for me, and I'm excited to try something altogether different.  I feel like I haven't been willing to break out of my creative comfort zone, and it's been detrimental to my work.  I'm hoping this new challenge will force a breakthrough. 

Friday, September 28, 2012

Happy Accidents

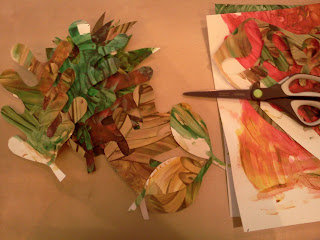
A great side effect of any art project involving cut paper are the scraps.  This week, my center had a door decorating contest, and my class created a literacy-themed autumn scene using all manner of paper products.  I might have gone a little too far in a few places, but it was worth it:


My favorite part of creating the door was making finger-painted leaves, as seen below:


 In order to get the desired effect we drew leaf outlines on one side of the paper and let our kids finger paint as a group on the opposite side.  


Once the paint was dry I cut out the leaves and found myself with a giant pile of beautiful scraps.  


I decided to put the scraps to good use and give my kids the opportunity to make some Matisse-inspired paper collages.  


The finished product will be displayed at our deck party, along with fall-themed work from various classes.  There will be follow-up pictures soon!

Wednesday, September 19, 2012

Mosaics


There's nothing super-original about mosaics, but it's always fun, and Philadelphia happens to be home to Isaiah Zagar, a fantastic local artists who creates beautiful mosaic murals all over the city.  Here's his Wikipedia page: http://en.wikipedia.org/wiki/Isaiah_Zagar  

and here are some examples of his work:


After a brief discussion about mosaics and how they are made, Preschool and Pre-K experimented with a variety of objects to make their own mosaic tile...


I used a pretty standard airdry clay, it worked really well.  I would not recommend playdough, because it tends to crack as it dries, and it will stick to the table.  I gave them an assortment of beads, clear plastic pieces, tiles and buttons, but really anything you have laying around will work.


...I would also recommend flouring the table first, or working on something that can be removed after the project is complete, because I did have a little trouble getting the tiles off of the table.  


...It was also fun to teach them how to make patterns and imprints in the clay using either clay tools or some of the textured beads.  One of my students actually worked almost entirely with imprints.


These were the final pieces, and I am very excited about them.  The kids had a really great time with this project, and I think we are going to try to work with clay more often.


Monday, September 17, 2012

OWLS!


I have seen a few variations of this project and wanted to try it out with my kids.  I am always looking for new, creative projects involving toilet paper rolls because they are EVERYWHERE and they seem to have a million applications.  I helped create the shape of the owl by bending the center of the TP rolls in to form the classic owl "ears", and I also cut out feet and a tail (older kids can do this step themselves with teacher help).  We used brown and white tempera paint and some natural feathers to decorate our owls.


They're a little creepy without eyes... 


...Once students were finished painting their owls I helped them attach eyes and a beak.  


...I included the owls in the city we just created, either flying in the sky...


...or perched on top of buildings...


This was a great project idea, I'm glad I got a chance to give it a shot.  Check out these websites for great examples of this project:  http://naturalkidsteam.com/wordpress/2010/11/kid-craft-owls/

Saturday, September 15, 2012

Recent Sketches and Whatnot...

So, I'm brainstorming ideas for this show I will be having in a few months at a cafe called Chhaya in lovely South Philly.  I haven't really fleshed out what I want to do yet, but I've been trying to sketch out some thoughts, and this is the stuff I've been working on: 


These are all pen, ink & gesso on paper.  Some are inspired by old and strange photos I've dug up in local curio shops and the great big interweb, some are just images that come out of my hands when I'm not looking...


...this one was based on a Mexican bingo board...


...this one is based on an episode of the X-Files involving Agent Scully's long lost daughter who turns out to be a government experiment.  Long story...


...I found a photograph of my dad posed with a pantless mannequin, and it obviously needed to become a drawing (R).  I don't know where spooky winter guy came from (L)...


...I had a stockpile of scrap wood lying about, so I decided to start this "tile" project...


...Ultimately I intend to fit all the tiles together into one larger piece.  I'm also thinking that the I might do a large-scale version of the patterns I've been making (below), maybe 4'x6'.  It is very rare that I work large, and I'd like to give it a shot...


...More hands...I like hands, apparently...


So that's all for now.  More to come soon...